Monday, December 16, 2013

Christmas Fun

Hello All,
Welcome to my last blog post for the year 2013. I hope that you are all having fun wherever you are, and that the time spent on holiday, with family or friends or just some quiet time spent alone, is filled with reflection on the year past and filled with hope for the future.
The layout I made for this post is of some photos taken a long time ago when my kids were small and the excitement around a jolly Christmas Father still made their eyes twinkle. Well the youngest didn't think he was so jolly and the oldest was way to cool to show his excitement. The middle one could not wait to see him as the previous year he was the one screaming on Christmas Fathers' lap and this particular year he went to greet the man at the gate. Life through the eyes of a kid is awesome!!
I used the Simple Stories - December Documented - Collection as well as black and red American Craft card-stock.
With a Martha Steward edge punch I punched strips of pattern paper and then applied Stickles in various colours to them. These strips were attached to the top and bottom of the lay-out. For the saying on the left hand side I stamped a Kaisercraft stamp with embossing ink and then applied Ranger Antiquities Frosted Crystal embossing crystal. This embossing powder does not perform like normal embossing powder. When you heat it up the embossing powder becomes matte. This takes a little practice to get right, I had a few flops trying this. Once the saying was embossed I took ordinary blackboard chalk and applied it over the embossed area and rubbed it with my finger until I got a look I was happy with. The flowers and swirls were cut with the Silhouette Cameo.
The Christmas wreath is a Silhouette pattern. It was cut from the Hello December paper and then a few flowers and diamante were attached to the wreath. A ribbon was tied to the top of the wreath.
I fussy cut the elements from the Special Delivery paper and used them as embellishments on the layout.
Finally I randomly applied blackboard chalk on the top and bottom of the black card-stock. I used my finger to spread the chalk till I was happy with the look. 
This has to be the final step just before the lay-out is ready to be stored in plastic sleeves as the chalk tend to rub off while you handle the lay-out. I think if I ever have to redo this technique I will use a smooth card-stock, it seems to "hold" the chalk better. The heading of the layout was cut with the Silhouette machine from leftover pattern paper. Remember that all the products used are available form The Scrapbook Studio
Happy scrapping till next year - 2014
Lee
p.s May you all have a blessed Christmas time wherever you are!

Saturday, November 30, 2013

Advent Calender

t is December. Less than a month to Christmas. Wow.. this year just flew by in a blur of motion and I am still not organised for Christmas.... oh well, so it will be - again. 
When my kids were little there was lots of excitement around Advent calenders. As they grew older they each developed their own take on an Advent Calender. The oldest would take it and eat all the treats on the first day. The second one left it till the 24th and then ate all the treats. The third one left it all till February before eating all the treats - gleefully in front of her brothers. She gets her payback - sometimes.
My first project for this month is an Advent Calender that I made. I had so much fun making this project!! All the products used in this project except for the patterned paper are available from the Scrapbook Studio.
To make this calender I used my trusty Silhouette to cut the calender as well as all the little bits of paper. The calender is a pattern I got from an online store called SVG Cuts. They have pretty awesome projects for various cutting machines. The front, back as well as the inserts were cut from white card stock. After they were cut the inserts and the front were inked with Walnut stain Distress ink and splattered with water.
The back page was coloured with some distress stain. This is the bit of the back you will see when you open the little door.
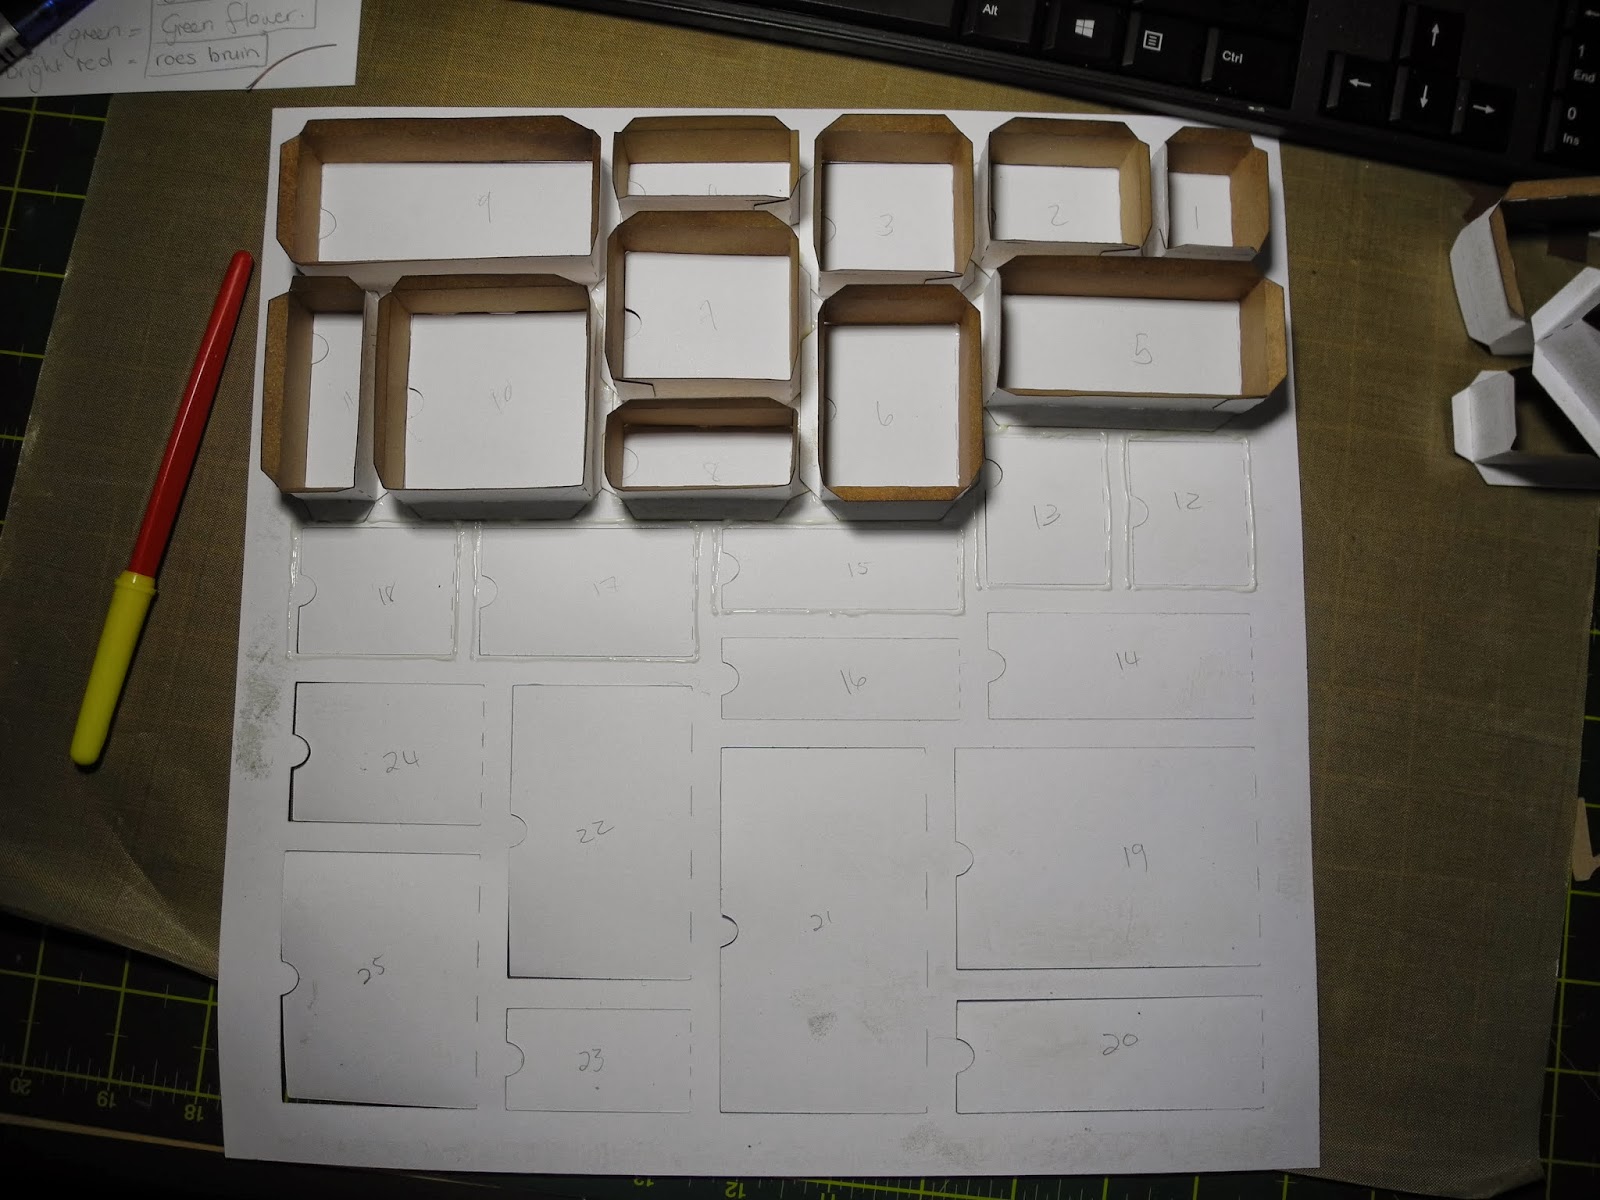
After this all the little inserts were inked, folded and glued together.
.....and then all the gluing started. Sorry for the bad photo but it was night time and I could not stop working, I was having way too much fun!!
The seam binding that forms the bow were coloured with some distress ink stain and attached to the side pieces with a stapler. The side pieces were then glued into place and the back was glued down. The front pieces of the calender was then attached in place. For the front I used some really old Kaisercraft Christmas paper 'Tis is the season collection from my stash as well as some leftover card stock. 
The background of number 5 was stamped with watermark ink and then some gold perfect pearls were brushed over it. 
I used some Cuttlebug embossing folders to add texture to some of the front pieces and brushed some more perfect pearls over it.
Number 21 was stamped with a Christmas stamp and some Walnut Stain distress ink.  
This picture shows the piece of the background paper visible when the little door is open.
Thanks for stopping by. Good luck to all of your preparations and planning for a wonderful Christmas time. If you are in doubt as to what to give a loved one why not get them a gift voucher from Scrapbook Studio? To all of you traveling on our roads please be safe, to those staying home..... Happy Scrapping!!
Lee

Friday, November 22, 2013

Marion Smith Designs is coming to Jeffreys Bay, South Africa!

http://scrapbookstudio.co.za/marion_smith/
Scrapbook Studio JBay is VERY proud and excited to announce our first International Scrapbook Event taking place in Jeffreys Bay! We are already 50% sold out so Book your seat NOW!

Saturday, November 16, 2013

Playing with Cards

Hello All,
Making cards and tags is always a nice way to try out new techniques. If the technique doesn't work, you don’t have a whole 12 x12 page that lands up in file 13. I am not a tag person but love to make cards. If the background didn’t work out as planned I normally put it in a box and next time around use them to punch out embellishments for another project. Today I would like to share with you a couple of cards I made trying out some new techniques.
Card 1:  Distress Ink
To create the background, use some antique linen, vintage photo and walnut stain distress ink. Ink through some stencils using walnut stain distress ink. After this, splatter on some water and dry it with a heat gun. Normally the splatter of the water would be before using the stencils, but I forgot to do this so I just reversed the process, it still came out pretty cool. A splatter stamp and some Versafine brown ink was used to stamp the splatter image on the background. Stamp the typewriter twice and fussy cut to create a 3d embellishment, stamp the sentiment on the paper part of the top typewriter and ink it with some antique linen distress ink. Complete the typewriter using 3d tape. Punch out some flowers and inked them with worn lipstick, tattered rose and Victorian velvet distress ink as well as ink the edges with walnut stain distress ink. Use some diamante as the centres of the flowers. The seam binding was colored with the same brown and pink distress inks as used on the card. The matt for the background was coloured heavily with some worn lipstick distress ink, splattered with water, dried with a heat gun and then inked with some walnut stain ink. The card front was lightly inked with victorian rose and vintage photo as well as walnut stain distress ink. Complete the card by putting everything together and lastly tie the seam binding around the completed card.
Card 2:  Distress Stain
Dab some picket fence distress ink on a craft sheet, dab some stormy sky, evergreen bough and faded jeans distress ink around the picket fence distress ink. Spritz with water and drag the card background through the distress ink until you are happy with it. Dry with a heat gun and while drying spritz some water on the card to create some droplets. When the background is dry add a bit of wild honey distress ink to the background and ink around the edges with black soot distress ink.. Ink a background stamp with some picket fence distress stain and dry with a heat gun. Next stamp a frame image, as well as a sentiment on the background with black Versafine ink. Stamp the butterfly with black ink on an off-cut piece of paper. Ink the butterfly with some wild honey distress ink. Colour a few paper roses with shabby shutters and wild honey distress stains. The matt for the background was coloured with some black soot distress ink , spritzed with water and dried with a heat gun. The card was inked with some evergreen bough, and black soot distress ink. Attach the background to the matt and sew around the edge (machine or by hand). The film strip was attached with a tiny attacher. The staples were coloured with some alcohol ink to match the background of the card. Attach the roses and butterfly to the card. Use the snipped off stems of the roses, wrap them around a paper piercer and attach two of them behind the butterfly. Attach to the card and finish off with some diamanté.
Card 3:  Alcohol Inks
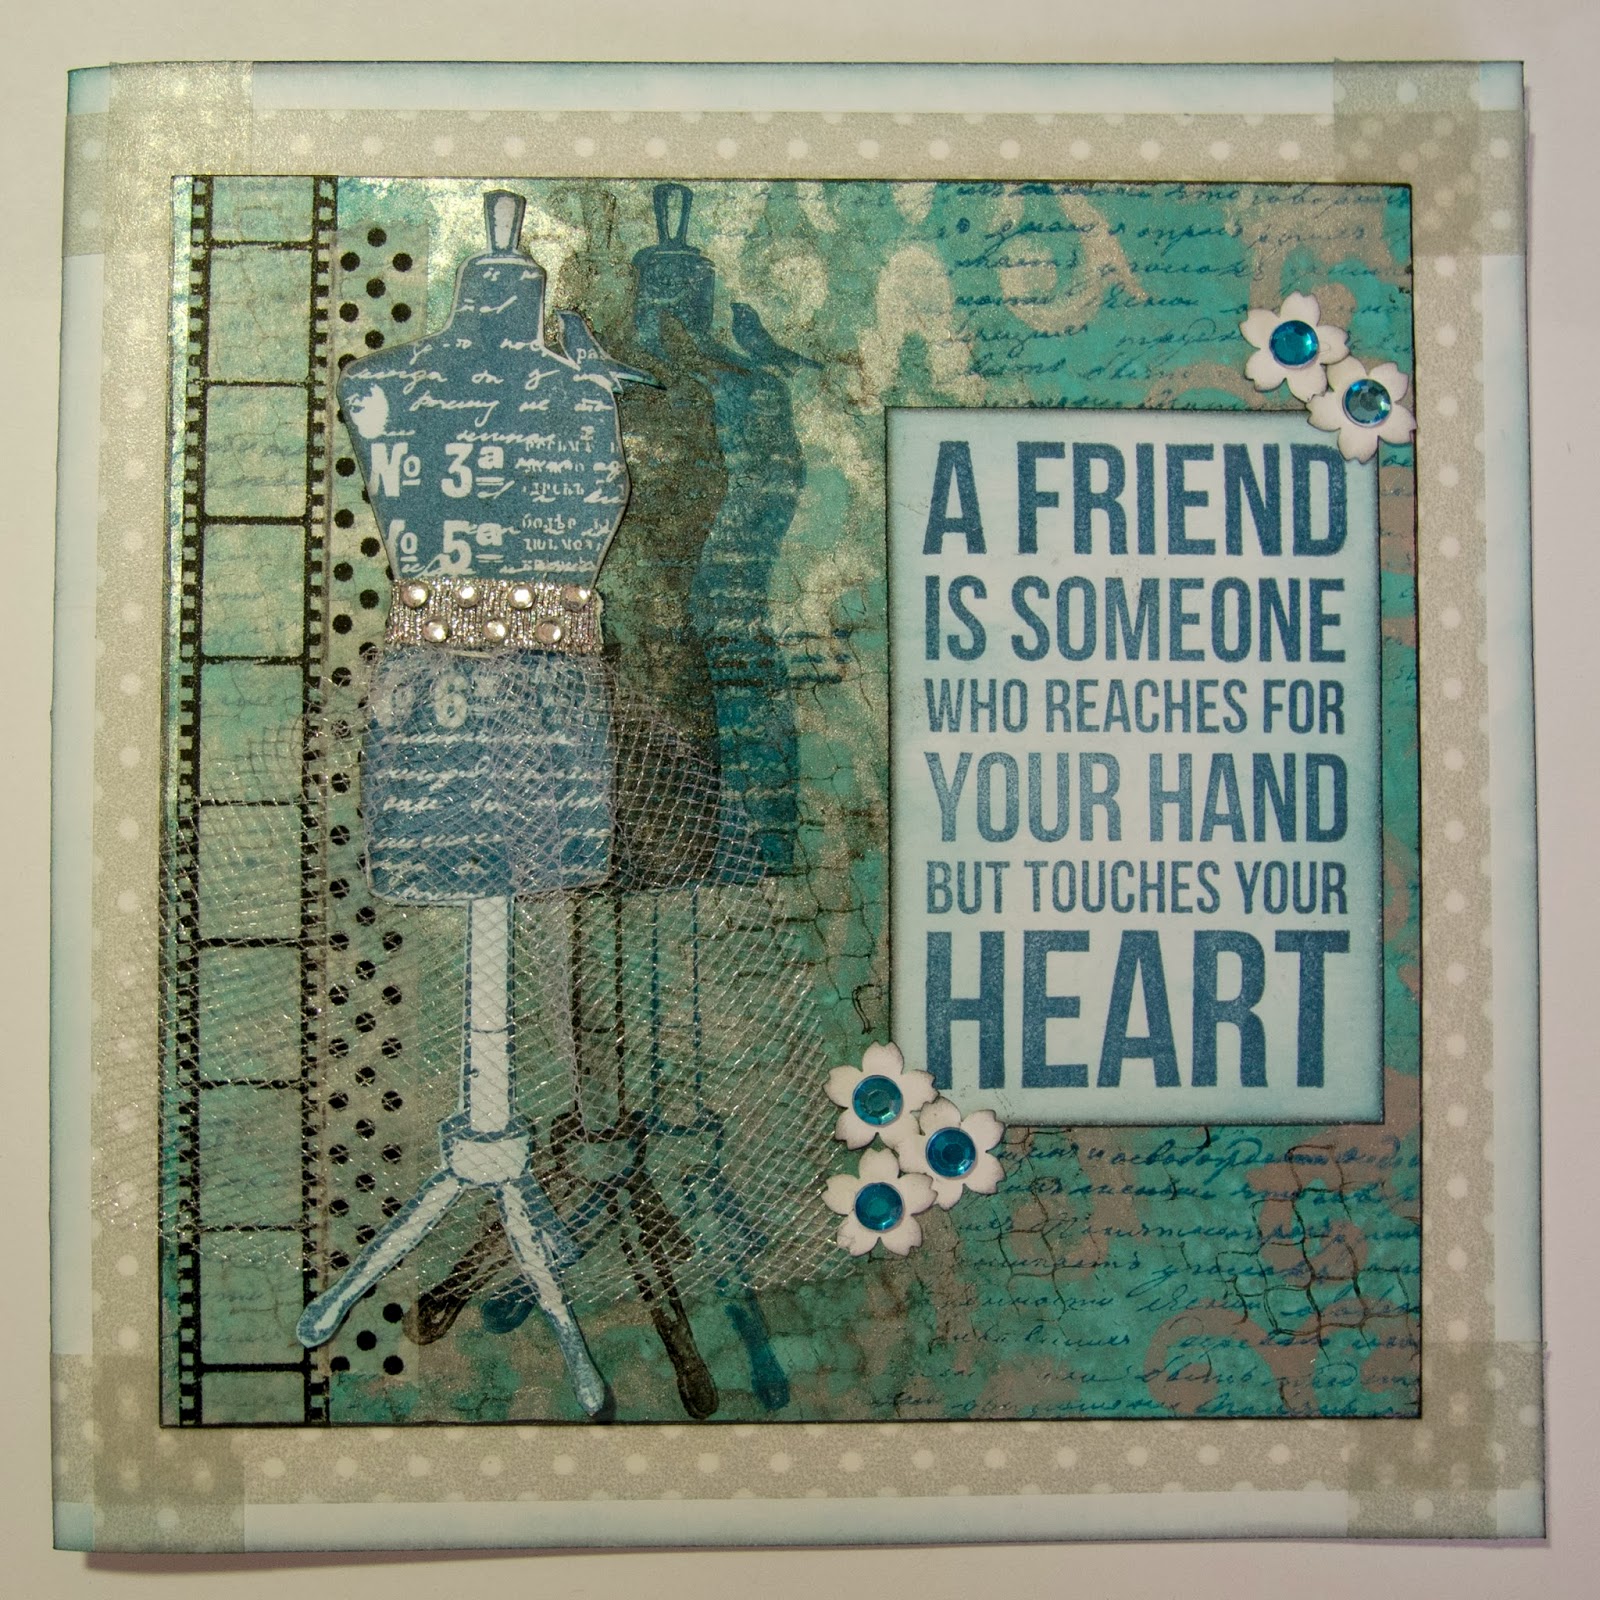
Dab the background was with some aqua alcohol ink on a piece of glossy card stock. Put some alcohol ink silver mixative on your craft sheet. Pick the mixative up with an ink applicator and some blending foam and gently dab through the stencil onto the background. Stamp some background images on the card, use first, second and third generation (I used a script stamp with Versa Magic Ocean Depth chalk ink, and a chicken wire stamp with some black Staz On ink) After this is done use an ink applicator with some felt, put some blending solution on the felt and dab around the card to sort of blur the background. Be careful not to put to much blending solution on the felt. You just want the edges to blur. Attach some washi tape to the left side of the back ground. Ink the edges with some Versa Magic Midnight Black chalk ink. With the background done use a dress form and stamp the image twice on the background, once with black Staz On Ink, and then with Versa Magic Ocean Depth chalk ink. Overlap the stamped images with each other. The third dress form was stamped on off cut white card-stock with Versa Magic Ocean Depth chalk ink, fussy cut it and lightly ink with peacock feathers distress ink as well as black soot around the edges. Embellish the dress form with some netting, ribbon and diamanté, and attach to the background overlapping the stamped dress form. The sentiment was stamped on off cut white card-stock with some Versa Magic Ocean Depth chalk ink. Lightly ink this with peacock feathers distress ink as well as ink the edges with some black soot distress ink. Attach to the background. Punch some flowers, ink the edges with some black soot distress ink, use some diamanté as flower centres. Attach these to the background. The card was lightly inked with peacock feathers and some black soot distress ink around the edges. Some grey polka dot washi tape was used as a frame before the background was attached to the card.
Card 4: Distress Paint Dabbers
Dab some distress paints on your craft sheet. I used wild honey, vintage photo, fired brick and some antique linen. Spritz the paints with water and drag the card through the paints until you are happy with the result. Spritz the card with water to make the paint react more and then dry with a heat gun. Dab some more distress paint on the craft sheet. With a distress ink applicator and some blending foam pick up bits of the distress paint and dab through various stencils onto the background. Cut half a circle from some off-cut patterned paper, ink with some vintage photo distress ink. The matt for the background was cut from dark brown card stock, and punched around two sides. Little circles were punched from a “flop” and used on the border. Attach the background to the matt. I used a sewing machine to create the rays of the sun as well as sew around the background and the half circle. The banner was cut from off cut white card-stock, inked with vintage photo distress ink and the sentiment was stamped onto it. This was attached to the card with some 3d squares. To complete the card attach some buttons. Attach this to a craft coloured card, which was inked with some vintage photo distress ink.
Remember, all the supplies I have used are available at the Scrapbook Studio
Happy scrapping
Lee


Wednesday, October 30, 2013

Scrapping those original photographs...

Hello All,
Scrapping those original photos can sometimes be daunting, especially if we compare the photos we have against all the layouts we see on the internet. When my kids were little I had no interest in scrapping and digital cameras were not an everyday item. The photos of events in their lives tend to either be a single photo, or they were photos given to me by people who attended the event, so some are developed as glossy photos and some matt. It was also before new born babies had photo shoots so the new arrival in the family was snapped by a very excited granny while the kid was held up behind a glass partition by an unknown nurse – enough to make your mojo run and hide in a closet for weeks.
I know we can scan these photos, photo-shop them and have them re-developed but I believe they are part of the story we are telling through our scrapping so I like to use them as they are. If there is a part on the photo you would really like to get rid off like a finger in front of the lens, try to cover that with an embellishment or two.
So today’s layout is of my eldest son's first birthday. He will be 20 this year – boy time flies! I had a lot of photos for this event in his life, and wanted to use them all. This made for a photo-heavy layout, so I decided to go light on the embellishments. A booklet was created for the left side of the lay-out to make more space for photos and some journaling.  
Products used:
White card-stock base
Black card-stock – photo matts
Echo Park – A boy's life – Imagination
Dark blue / Orange (red)
Simple Stories – Harvest Lane – Teal dot / Ledger
Black Soot Distress Ink
Corner round punch
Note book punch
Heart ink
Ever favorite Silhouette Machine
Tri-Boss Boofle embossing folder
Embossing pad and embossing powder

Honeycomb stencil – cut with the Silhouette machine
Randomly ink lightly through the honey-comb stencil on the white card-stock with black soot distress ink. I normally don't pick up new ink but just use the leftover ink on my blending foam. Ink around the edges of the white card-stock with black soot distress ink. Using the patterned paper cut them in various sizes, round the corners and ink the edges. Arrange them on the background.
Cut the booklet, round the corners, ink the edges and attach to the lay-out. The top photo shows the booklet open, the clear space is where I will put my journaling. Matt the photographs on the black card-stock and attach them to the lay-out.
The Happy Birthday heading and the number one was cut from off-cut patterned paper with the Silhouette machine, inked and then embossed with embossing powder. Various sizes of hearts was also cut from off-cut patterned paper with the Silhouette machine and inked. Some of them were embossed with the Boofe embossing folder and then some embossing powder was used on it. Arrange these elements on the front cover of the booklet.
Now I know what you are thinking: “A booklet! Yay, but how do I put a page like that in my album?”
Well, let me help you. Place your layout into the plastic sleeve. Mark the position of the booklet on the plastic sleeve. Once you have marked the position on the sleeve, remove the layout and put a craft mat into the sleeve. With a ruler and craft knife slit the plastic between the marks. Now put your layout back into the sleeve but let the flap of the booklet go through the slit in the sleeve. I find it easier to mark the position of the booklet but not to stick the booklet down yet. Then after I complete the layout, slip it into the sleeve and then just slip the booklet through the slit in the plastic and stick it down. Hope this helps!!
Mmmmm.... taking photos through a plastic sleeve is not that easy. It does however show the left side
of the layout in the plastic sleeve.
Remember all the products used on this layout are available at the Scrapbook Studio.
Happy scrapping!
Lee


Tuesday, October 15, 2013

Silhouette in Motion....

Hello All,
A Silhouette cutting machine opens so many doors in the way you can scrap and do other art projects. Did you know that you can plan out your whole layout in the Silhouette software? Planning what you want on your page, the size of your embellishments as well as where you want to place it.
 This is a screenshot of what my layout looked like in the Silhouette software. The word “awesome” and the splat are designs from the Silhouette online store. There are lots and lots of designs to choose from in the online store.  The superhero is a design I created myself to be paper pieced together. From here I moved all the pieces of the various colours to a new page to be cut.
And here is how the layout turned out………..
….pretty close to what I had planned, don’t you think?  When I work with a layout that has a lot of cut pieces I keep a holder with me to put the cut pieces in. This prevents that the sneaky dot on the “i” does not disappear. 
This is a picture of the first side of the background after it was completed.
The heading was assembled and then attached in place with some 3d foam to give it some more dimension.
This is a close-up of the wording on the layout after it was assembled.
Oooooh….. and here is the Super Hero that was paper pieced together. He is so cute. The super hero was attached to the lay-out with some 3d foam tape.
 Lastly, a close-up of one of the two bigger stars. I did some silver leafing on the stars and then ran them through a Couture Creations – World Fair Collection – embossing folder. After that they were attached to the lay-out.

Remember all the supplies used on this layout are available at the Scrapbook Studio.
Thanks for stopping by.
Happy Scrapping
Lee

Wednesday, October 2, 2013

My Mind's Eye - Continue

Hello All,
In my previous post, I shared a layout made with My Mind’sEye – "Find your wings and fly"- range of papers. Today I would like to share a follow up layout with the same range of papers. It really is a beautiful range of papers. All supplies used are available from the Scrapbook Studio. The photo is of me at age 2. In this layout there is a lot of layering and some machine stitching. It is a really busy layout but the range of papers goes so well together. All the bits of paper used on the layout were inked with black soot distress ink.
A craft knife was used to cut the “hold fast to your dreams” and “top priority” enough to slip the background in and then lies on top of the photograph as part of the embellishments. Ink them with black soot distress ink.
This is a photo of the left side of the layout, showing all the layers as well as some of the machine stitching. The doily was inked with black soot distress ink and then sprayed with some perfect pearl mists. Some twine was wrapped around the “Bloom where you were planted” embellishment.
A close up of the right side showing some more machine stitching a bit of paper that was punched with a notepaper punch and then inked with some distress ink - peeled paint and some black soot. 
The heading “Me @ 2” was cut with a Silhouette Machine.
 Thank you for stopping by.
Happy Scrapping.
Lee