Scrapbook Studio JBay is VERY proud and excited to announce our first International Scrapbook Event taking place in Jeffreys Bay! We are already 50% sold out so Book your seat NOW!
Friday, November 22, 2013
Saturday, November 16, 2013
Playing with Cards
Hello All,
Making cards and tags is always a nice way to try out new
techniques. If the technique doesn't work, you don’t have a whole
12 x12 page that lands up in file 13. I am not a tag person but love
to make cards. If the background didn’t work out as planned I
normally put it in a box and next time around use them to punch out
embellishments for another project. Today I would like to share with
you a couple of cards I made trying out some new techniques.
Card 1: Distress Ink
To create the background, use some antique linen, vintage photo
and walnut stain distress ink. Ink through some stencils using walnut
stain distress ink. After this, splatter on some water and dry it
with a heat gun. Normally the splatter of the water would be before
using the stencils, but I forgot to do this so I just reversed the
process, it still came out pretty cool. A splatter stamp and some
Versafine brown ink was used to stamp the splatter image on the
background. Stamp the typewriter twice and fussy cut to create a 3d
embellishment, stamp the sentiment on the paper part of the top
typewriter and ink it with some antique linen distress ink. Complete
the typewriter using 3d tape. Punch out some flowers and inked them
with worn lipstick, tattered rose and Victorian velvet distress ink
as well as ink the edges with walnut stain distress ink. Use some
diamante as the centres of the flowers. The seam binding was colored
with the same brown and pink distress inks as used on the card. The
matt for the background was coloured heavily with some worn lipstick
distress ink, splattered with water, dried with a heat gun and then
inked with some walnut stain ink. The card front was lightly inked
with victorian rose and vintage photo as well as walnut stain
distress ink. Complete the card by putting everything together and
lastly tie the seam binding around the completed card.
Card 2: Distress Stain
Dab some picket fence distress ink on a craft sheet,
dab some stormy sky, evergreen bough and faded jeans distress ink
around the picket fence distress ink. Spritz with water and drag the
card background through the distress ink until you are happy with it.
Dry with a heat gun and while drying spritz some water on the card to
create some droplets. When the background is dry add a bit of wild
honey distress ink to the background and ink around the edges with
black soot distress ink.. Ink a background stamp with some picket
fence distress stain and dry with a heat gun. Next stamp a frame
image, as well as a sentiment on the background with black Versafine
ink. Stamp the butterfly with black ink on an off-cut piece of paper.
Ink the butterfly with some wild honey distress ink. Colour a few
paper roses with shabby shutters and wild honey distress stains. The
matt for the background was coloured with some black soot distress
ink , spritzed with water and dried with a heat gun. The card was
inked with some evergreen bough, and black soot distress ink. Attach
the background to the matt and sew around the edge (machine or by
hand). The film strip was attached with a tiny attacher. The staples
were coloured with some alcohol ink to match the background of the
card. Attach the roses and butterfly to the card. Use the snipped off
stems of the roses, wrap them around a paper piercer and attach two
of them behind the butterfly. Attach to the card and finish off with
some diamanté.
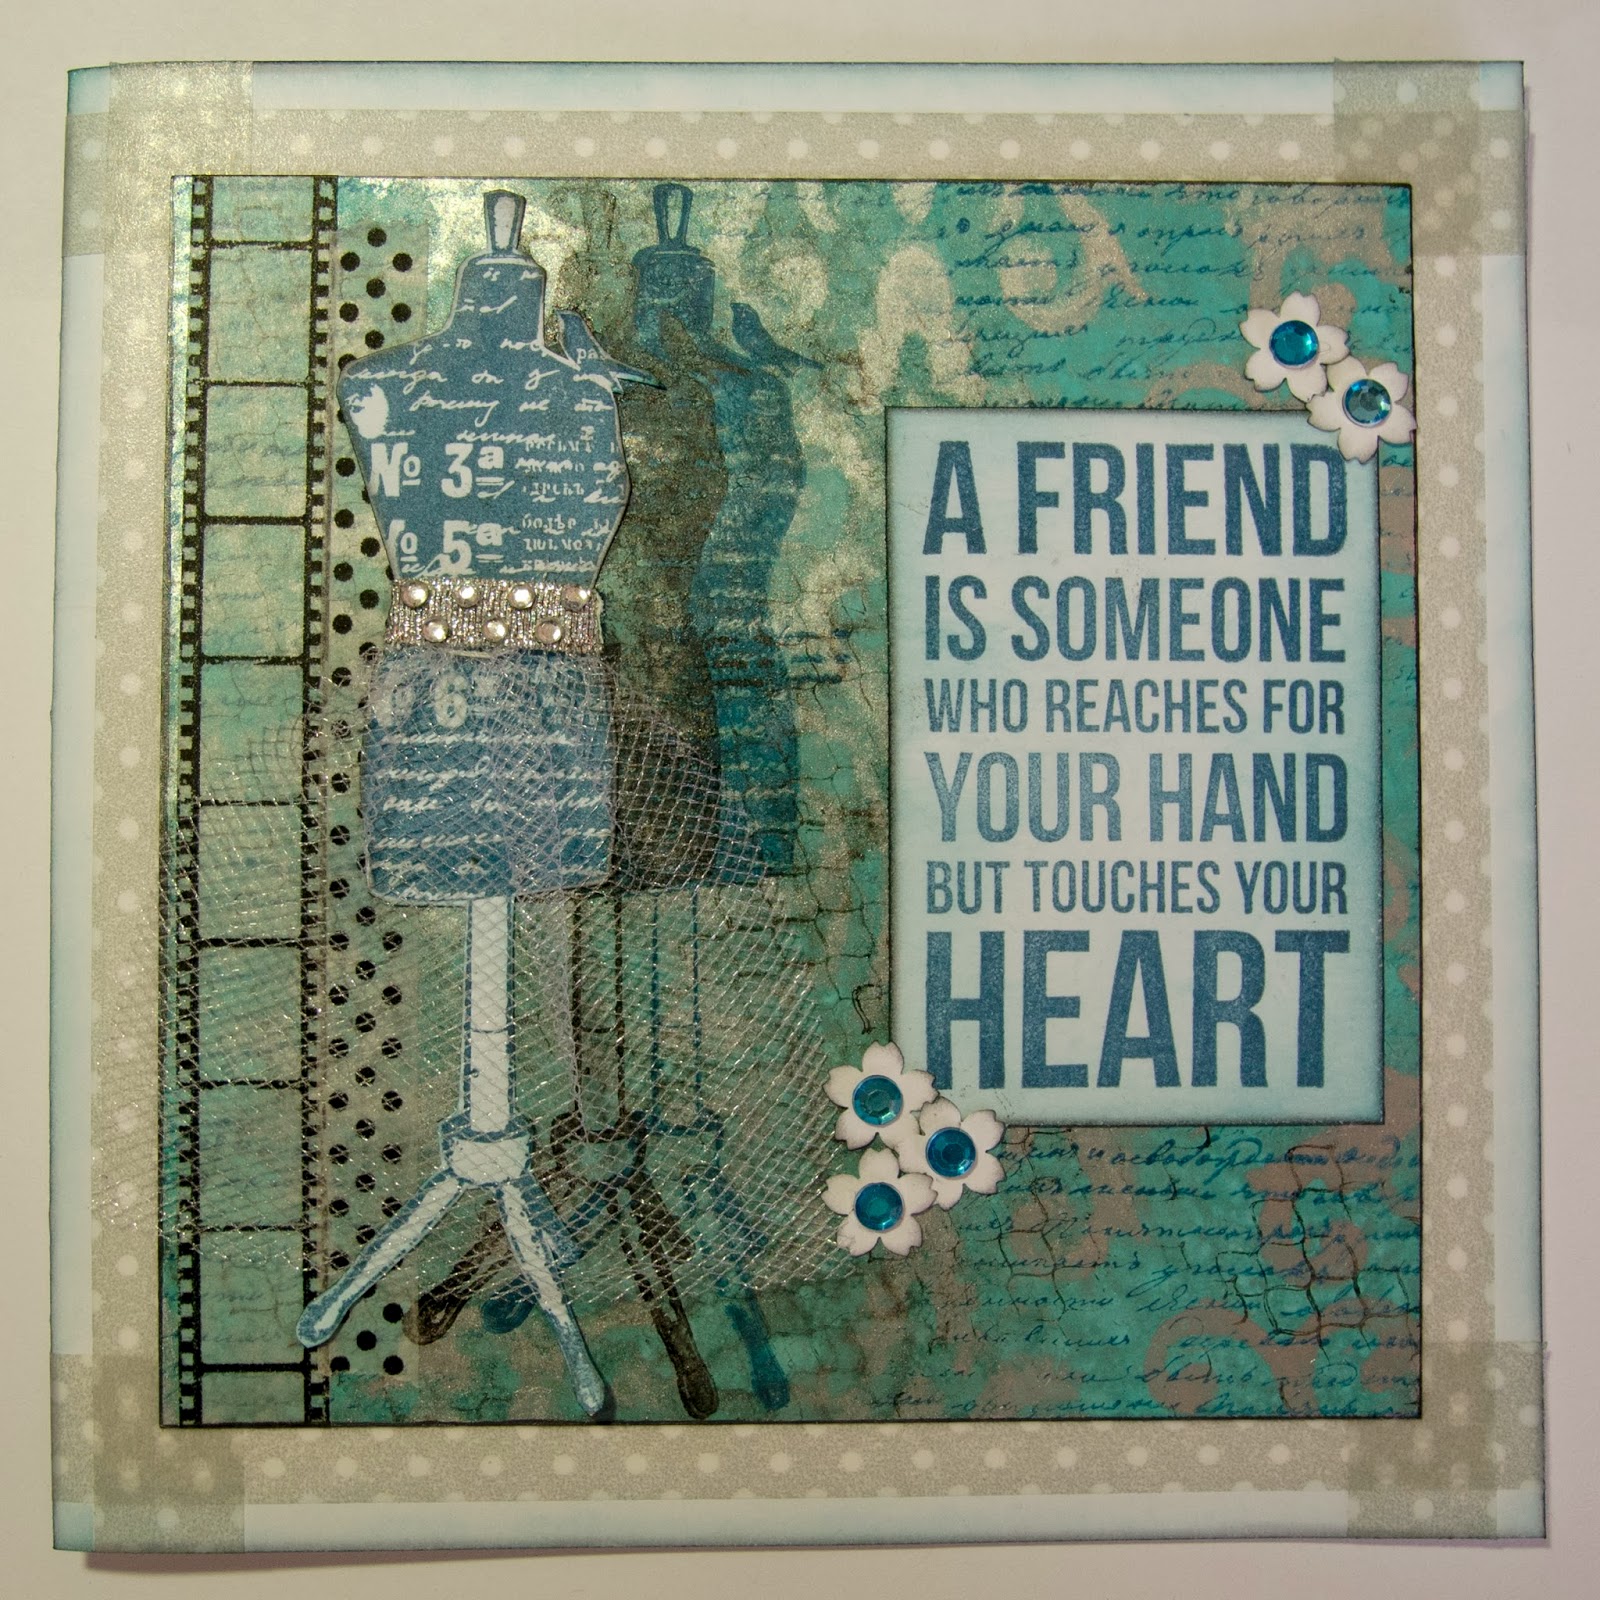
Card 3: Alcohol Inks
Dab the background was with some aqua alcohol ink on
a piece of glossy card stock. Put some alcohol ink silver mixative on
your craft sheet. Pick the mixative up with an ink applicator and
some blending foam and gently dab through the stencil onto the
background. Stamp some background images on the card, use first,
second and third generation (I used a script stamp with Versa Magic
Ocean Depth chalk ink, and a chicken wire stamp with some black Staz
On ink) After this is done use an ink applicator with some felt, put
some blending solution on the felt and dab around the card to sort of
blur the background. Be careful not to put to much blending solution
on the felt. You just want the edges to blur. Attach some washi tape
to the left side of the back ground. Ink the edges with some Versa
Magic Midnight Black chalk ink. With the background done use a dress
form and stamp the image twice on the background, once with black
Staz On Ink, and then with Versa Magic Ocean Depth chalk ink. Overlap
the stamped images with each other. The third dress form was stamped
on off cut white card-stock with Versa Magic Ocean Depth chalk ink,
fussy cut it and lightly ink with peacock feathers distress ink as
well as black soot around the edges. Embellish the dress form with
some netting, ribbon and diamanté, and attach to the background
overlapping the stamped dress form. The sentiment was stamped on off
cut white card-stock with some Versa Magic Ocean Depth chalk ink.
Lightly ink this with peacock feathers distress ink as well as ink
the edges with some black soot distress ink. Attach to the
background. Punch some flowers, ink the edges with some black soot
distress ink, use some diamanté as flower centres. Attach these to
the background. The card was lightly inked with peacock feathers and
some black soot distress ink around the edges. Some grey polka dot
washi tape was used as a frame before the background was attached to
the card.
Card 4: Distress Paint Dabbers
Dab some distress paints on your craft sheet. I used wild honey,
vintage photo, fired brick and some antique linen. Spritz the paints
with water and drag the card through the paints until you are happy
with the result. Spritz the card with water to make the paint react
more and then dry with a heat gun. Dab some more distress paint on
the craft sheet. With a distress ink applicator and some blending
foam pick up bits of the distress paint and dab through various
stencils onto the background. Cut half a circle from some off-cut
patterned paper, ink with some vintage photo distress ink. The matt
for the background was cut from dark brown card stock, and punched
around two sides. Little circles were punched from a “flop” and
used on the border. Attach the background to the matt. I used a
sewing machine to create the rays of the sun as well as sew around
the background and the half circle. The banner was cut from off cut
white card-stock, inked with vintage photo distress ink and the
sentiment was stamped onto it. This was attached to the card with
some 3d squares. To complete the card attach some buttons. Attach
this to a craft coloured card, which was inked with some vintage
photo distress ink.
Remember, all the supplies I have used are available at the Scrapbook Studio
Happy scrapping
Lee
Wednesday, October 30, 2013
Scrapping those original photographs...
Hello All,
Scrapping those original photos can sometimes be daunting, especially
if we compare the photos we have against all the layouts we see on
the internet. When my kids were little I had no interest in scrapping and digital cameras were not an everyday item. The photos of events in their lives tend
to either be a single photo, or they were photos given to me by
people who attended the event, so some are developed as glossy photos
and some matt. It was also before new born babies had photo shoots so
the new arrival in the family was snapped by a very excited granny
while the kid was held up behind a glass partition by an unknown
nurse – enough to make your mojo run and hide in a closet for
weeks.
I know we can scan these photos, photo-shop them and have them
re-developed but I believe they are part of the story we are telling
through our scrapping so I like to use them as they are. If there is
a part on the photo you would really like to get rid off like a
finger in front of the lens, try to cover that with an embellishment
or two.
So today’s layout is of my eldest son's first birthday. He will
be 20 this year – boy time flies! I had a lot of photos for this
event in his life, and wanted to use them all. This made for a
photo-heavy layout, so I decided to go light on the embellishments. A
booklet was created for the left side of the lay-out to make more
space for photos and some journaling.
Products used:
White card-stock base
Black card-stock – photo matts
Echo Park – A boy's life – Imagination
Dark blue / Orange (red)
Simple Stories – Harvest Lane – Teal dot / Ledger
Black Soot Distress Ink
Corner round punch
Note book punch
Heart ink
Ever favorite Silhouette Machine
Tri-Boss Boofle embossing folder
Embossing pad and embossing powder
Honeycomb stencil – cut with the Silhouette machine
Randomly ink lightly through the honey-comb stencil on the white
card-stock with black soot distress ink. I normally don't pick up new
ink but just use the leftover ink on my blending foam. Ink around the
edges of the white card-stock with black soot distress ink. Using the
patterned paper cut them in various sizes, round the corners and ink
the edges. Arrange them on the background.
Cut the booklet, round the corners, ink the edges and attach to
the lay-out. The top photo shows the booklet open, the clear space is
where I will put my journaling. Matt the photographs on the black
card-stock and attach them to the lay-out.
The Happy Birthday heading and the number one was cut from off-cut patterned paper with the Silhouette
machine, inked and then embossed with embossing powder. Various sizes
of hearts was also cut from off-cut patterned paper with the Silhouette machine and inked. Some of them
were embossed with the Boofe embossing folder and then some embossing
powder was used on it. Arrange these elements on the front cover of
the booklet.
Now I know what you are thinking: “A booklet! Yay, but how do I
put a page like that in my album?”
Well, let me help you. Place your layout into the plastic sleeve. Mark the position of
the booklet on the plastic sleeve. Once you have marked the position
on the sleeve, remove the layout and put a craft mat into the sleeve.
With a ruler and craft knife slit the plastic between the marks. Now
put your layout back into the sleeve but let the flap of the booklet
go through the slit in the sleeve. I find it easier to mark the
position of the booklet but not to stick the booklet down yet. Then
after I complete the layout, slip it into the sleeve and then just
slip the booklet through the slit in the plastic and stick it down.
Hope this helps!!
Mmmmm.... taking photos through a plastic sleeve is not that easy.
It does however show the left side
of the layout in the plastic
sleeve.
Remember all the products used on this layout are available at the Scrapbook Studio.
Happy scrapping!
Lee
Tuesday, October 15, 2013
Silhouette in Motion....
Hello All,
A Silhouette cutting machine opens so many doors in the way
you can scrap and do other art projects. Did you know that you can plan out
your whole layout in the Silhouette software? Planning what you want on your
page, the size of your embellishments as well as where you want to place it.
And here is how the layout turned out………..
….pretty close to what I had planned, don’t you think? When I work with a layout that has a lot of
cut pieces I keep a holder with me to put the cut pieces in. This prevents that
the sneaky dot on the “i” does not disappear.
This is a picture of the first side of the background after
it was completed.
The heading was assembled and then attached in place with
some 3d foam to give it some more dimension.
This is a close-up of the wording on the layout after it was
assembled.
Oooooh….. and here is the Super Hero that was paper pieced
together. He is so cute. The super hero was attached to the lay-out with some 3d
foam tape.
Remember all the supplies used on this layout are available at the Scrapbook Studio.
Thanks for stopping by.
Happy Scrapping
Lee
Wednesday, October 2, 2013
My Mind's Eye - Continue
Hello All,
In my previous post, I shared a layout made with My Mind’sEye – "Find your wings and fly"- range of papers. Today I would like to share a
follow up layout with the same range of papers. It really is a beautiful range
of papers. All supplies used are available from the Scrapbook Studio. The photo is of me at age 2. In this layout there is a lot of layering and some machine
stitching. It is a really busy layout but the range of papers goes so well
together. All the bits of paper used on the layout were inked with black soot
distress ink.
A craft knife was used to cut the “hold fast to your dreams”
and “top priority” enough to slip the background in and then lies on top of the
photograph as part of the embellishments. Ink them with black soot distress
ink.
This is a photo of the left side of the layout, showing all
the layers as well as some of the machine stitching. The doily was inked with
black soot distress ink and then sprayed with some perfect pearl mists. Some
twine was wrapped around the “Bloom where you were planted” embellishment.
A close up of the right side showing some more machine
stitching a bit of paper that was punched with a notepaper punch and then inked
with some distress ink - peeled paint and some black soot.
The heading “Me @ 2” was cut with a Silhouette Machine.
Thank you for stopping by.
Happy Scrapping.
Lee
Monday, September 16, 2013
1957 Mannequin
Hello All!
Today I would like to share a layout made with My Mind’s Eye
– Find your wings and fly – range of papers. The photos are of my mother-in-law as a young girl. These photos were taken for her modelling portfolio. I had loads of fun creating this
layout and I might just have a new favorite range of papers – for now! They are
simply stunning. All the products used
are available at the Scrapbook Studio.
Products used on this layout:
Find your wings and fly – My Mind’s
Eye patterned paper
White card-stock
Grey card-stock
Doily
MME – Stella and Rose Decorative
brads
Petaloo Darjeeling collection
flowers - paprika
Decorative Stamps – MME - Find
your wings and fly
Kaisercraft texture clear stamp –
grid
Ranger Adirondack - earthtones -
slate
The Crafters Workshop 6x6 stencil
– mini chicken wire reversed
Ranger distress ink – black soot,
wild honey, fired brick
Mister Huey’s Ink
Perfect Pearl Mists – Heritage gold
Needle and thread
These photos show how to build
the background of the layout. First decide where you want to place the reversed
chicken wire stencil on the white card-stock background and ink it with distress
ink wild honey and fired brick. The next layer is done over the stencil with
the clear grid texture stamp and Adirondack slate ink. Then splatter the background
with Mister Huey’s ink as well as Perfect Pearl Mists – Heritage gold.
Using the grey card-stock and patterned
papers of your choice build the next layers of your layout. Using distress ink –
black soot – ink all the edges of the paper. Place your photos on the layout and
now you can start creating the embellishment clusters.
These photos show the method of how
to make the paper rolls used in the embellishment clusters. This is a nice way to add height to the flower
clusters. 1. Cut paper in various widths but of the same length so that the paper
rolls are all the same thickness. 2. Place some glue on the edge (inside) of the
paper. Start rolling at the opposite edge around a toothpick. 3. Repeat this until
you made all the paper rolls you will need, and ink the rolled edges. 4. Finished!
Use the doily to make a flower.
The doily was treated with water, Mister Huey’s sprays as well as some Perfect
Pearl – Heritage Gold mist. The inside of the doily was cut out and the edge
section (lacy section) was used to make a zig-zag fold flower. One of the MME –
Stella and Rose Decorative brads was used for the center of the flower. The
leftover section of the doily was used to punch little circles.
The heading was cut with a
Silhouette Cameo, and as a final touch some sewing was added to the layout. (Oops, so sorry, my heading seems to have lost the dot on the "i"!)
Finally a closer look at the embellishment cluster at the top left of the layout.
Thank you for looking.
Happy Scrapping
Lee :)
Sunday, September 8, 2013
Sweet Child
Hello all!
It has been a while since we have had some Design Team Magic! But, sometimes amazing things take a little longer! We are so excited to announce that we have asked Lee Dreyer to be our in house Design Team! She is very talented and we can't wait to see what magic she creates for us in the months to come!
Please visit her blog te see some more of the magic she creates! Remember that you can purchase all products Lee uses at Scrapbook Studio!
Today I would like to share with you a layout full of fun and techniques. As a rule I do not fussy cut my photos but these photos were perfect for fussy cutting. The colouring of the photos were also a bit difficult to match with paper, so with the help of a friend we found three really old Scrapsheet papers that worked well with the photos and the rest of the paper were created with inks, masks and stamps.
Creating the background:
Place the two card stock sheets next to each other to form a single canvas. ( I use a bit of masking tape at the back to keep them together.
Photo 1: This shows randomly stamped images on the background. The first stamp image was done with weathered wood distress ink randomly around the page. The second stamped image (Prima Clear Stamp - Romace Novel) was also placed randomly on the page in peeled paint distress ink. These images overlap the first ones in certain places. After inking the stamp, it was stamped first on a off-cut paper and then stamped on the background so it is a light image.
Photo 2: With the Silhouette cutter I cut a diamond background in two sizes to use as masks on the background. These were also randomly placed and with black soot distress ink and a ink blending tool lightly inked through the mask. After inking the blending tool I removed some ink on a scrap piece of paper and then inked through the mask. This made the black soot distress ink a bit less harsh on the background. The process was repeated with the smaller diamond background.
Lastly I added some "bubble wrap" stamping with distress paint - salty ocean - to the background. Take a piece of bubble wrap and dab with the distress paint. Place it on the background where you want it, overlapping the stamped images. Carefully press down on the bubble wrap to transfer the paint, lift and voila - "bubble wrap" stamp!!
Creating the strips behind the photos:
Photo 1: I decided that a dot and a stripe paper will look good with the layout but the only way to have them is to create them. On a white piece of card stock I stamped some stripes of dots with a America Crafts - Birthday stamp and weathered wood distress ink.
Photo 2: The dot paper cut to size and ready to use.
Photo 3: The trusty Silhouette machine was used again to cut a stripe background. It was placed on a white piece of cardstock and inked with some peeled paint distress ink.
Photo 4: The mask was moved over to cover the green stripe and a second stripe was inked in some weathered wood distress ink.
A close-up of the strip. All the pieces were inked in black soot distress ink and attached to each other with some Tombo green glue. The strips were then attached to the background.
Paper piecing the hot air balloon:
Photo 1: After deciding on the size of the balloon the various parts were cut from some chipboard.
Photo 2: The pieces of the balloon cut from patterned paper. Remember to number them, it makes the sticking down order much easier. Before they were stuck down on a off-cut piece of cardstock the balloon pieces were inked with black soot distress ink.
Photo 3: The balloon almost done. After glueing the pieces on the cardstock cut the balloon out and ink the outline with black soot distress ink. Use some of the leftover dot stamped paper to cut the balloon detail and ink. The basket was cut from white cardstock and inked with black soot distress ink.
Photo 4: After adding some buttons, this is how the completed hot air balloon looks on the lay out.
The right top corner of the layout shows two other hot air balloons. Using the Farm House - Fair Skies Stamps Dusk, stamp the two hot air balloons on left over pattern paper in weathered wood distress ink. Cut them out and ink with black soot distress ink and use as embellishments.
A close-up of the saying on the left page of the lay-out. This is such a sweet saying I just love it.
The heading and the chevrons were cut with the Silhouette cutter and some buttons were randomly sewn to the layout. To finish the layout a 1" frame was attached with purple turtle foam tape to create a shadow box effect. It was also done to hide a red water stain on the edge of the lay-out after I managed to tip paint water over my work area. Note to self - remove water when done.!! Many ways to skin a cat and hide little messes!!
Thank you Lee! We can't wait to see what you have for us next! Please leave us a comment to let us kno if you enjoyed this tutorial and to let us know what you would like to see featured on our Blog!
Happy Scrapping!
Subscribe to:
Posts (Atom)